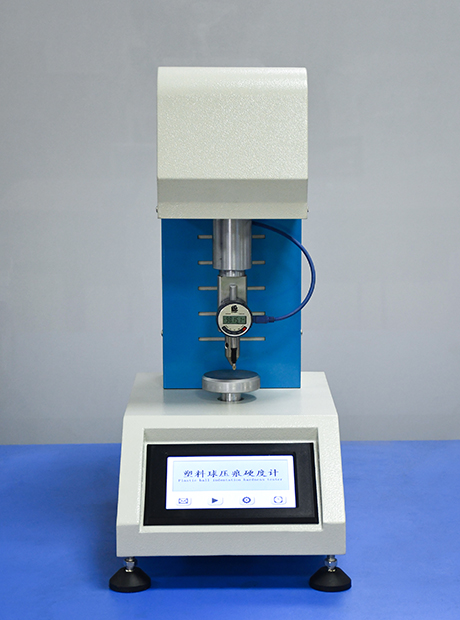
The instrument adopts micro processing control and integrated and digital measurement and control technology. Programmed setting shall be carried out according to the standard test procedure
Chinese color crystal display, touch screen operation, easy to understand.
Digital dial indicator, high-precision force measurement system, high measurement and control accuracy, stable control.
The micro printer prints the data.
The instrument is upgraded to touch screen control, which is novel, convenient and user-friendly.
The large 65535 true color color screen is used, with better visual effect and more information displayed on the interface.
The calculation function of the test results is improved. The decimal number is retained and the results are rounded to make the calculation results more accurate.
Various parameters can be set at will, which is more convenient for the operating flexibility of the tester and meets more test requirements
Any step in the test can be skipped manually to facilitate the test.
Hardness test method:
& nbsp;& nbsp;& nbsp;& nbsp;& nbsp; Plastic ball hardness
The plastic ball indentation hardness test is to use a steel ball with a specified diameter to vertically press into the surface of the sample under the action of the test load, and keep it for a certain time
Then read the indentation depth value. The hardness value can be obtained by calculation or looking up the table< br />
1. The thickness of the sample shall not be less than 4mm. The adjustable range of the loading speed is 2-7 seconds, usually 4-6 seconds, and the loading time is 30 seconds or 60 seconds< br />
The load size shall be selected according to the expected hardness of the sample, and larger load can be selected for higher hardness; On the contrary, take smaller load. If you can't predict
The hardness of the sample must be gradually upgraded from a small load to avoid damaging the steel ball indenter and the sample; Generally, as long as
The test can be carried out when the load is selected.
The hardness of ball indentation refers to that the steel ball with a specified diameter is vertically pressed into the surface of the sample under the action of the test load for a certain time
After that, the average pressure per unit area is expressed in Kgf/mm2 or N/mm2& nbsp;& nbsp;< br />
The expression is:
H=0.21p/0.25π D(h-0.04)(kg/ mm2)
P ― Load (kg)
H - indentation depth (mm)
D ― Diameter of steel ball (mm)
π― Pi
Note: h = h1-h2
H1: pressing depth of sample load (mm)< br />
H2: Rack deformation of the instrument under test load (mm)
3. The distance between the center of the measuring point and the edge of the sample shall not be less than 10mm, and the distance between the centers of two adjacent measuring points shall not be less than 10mm
& nbsp;& nbsp;& nbsp;& nbsp;& nbsp;& nbsp;& nbsp;& nbsp;& nbsp; Main purposes and functions:
Plastic hardness refers to the ability of plastic materials to resist the pressure of another rigid object that is regarded as not having elastic and plastic deformation. The plastic ball indentation hardness test is to use a steel ball with a specified diameter to vertically press into the surface of the sample under the test load, and read the indentation depth value after a certain period of time. The hardness value can be obtained by calculation or looking up the table< br />
Applicable standards
GB/T3398.1-2008
Plastics Determination of hardness Part 1: Ball indentation
ISO 2039-2-2001
Plastic hardness measurement Ball indentation hardness
JJG884-1994
Verification Regulation of Plastic Rockwell Hardness Tester
JJG369
Inspection procedures for plastic ball indentation hardness tester
 Reference& nbsp;& nbsp;& nbsp;& nbsp; Number
Basic parameters
Place of use
Indoor use, pollution degree 2, altitude up to 2000m
Operating temperature and humidity range
0 ℃~40 ℃, below 80% rh, no condensation
Storage temperature and humidity range
-10 ℃~50 ℃, below 80% rh, no condensation
Power supply/maximum rated power
AC210 V~240 V (50 Hz/60 Hz)/45 VA
Applicable standards
GB/T3398 & nbsp; ISO 2039 DIN53456
Volume and weight
270W× 630H× 360D mm, 60 kg
Measuring parameters
project
HQY-96
Test load
Ball indentation is divided into six levels: 9.8N (preload), 49N, 132N, 358N, 612N, 961N;
Steel ball indenter
Ф 5mm, Ф 10mm (ball indentation)
Minimum indexing value of indentation depth indication
0.001mm
Maximum allowable height of sample
30mm
Distance from ram to machine wall
100mm
Indication accuracy
± 2%
Timing range
10-90s
Timing accuracy
0.1s
Frame deformation
≤ 0.04mm
Main configuration and accessories
Test host
1 set
Microcomputer control system
1 set;
Touch screen display control module
1 set
Digital dial indicator
1 piece
High precision load cell
1
Micro printer
1 set
Motor servo
1 set
drive system
1 set
Power line
1
Host anchor
4
an instruction manual
1 copy
Product certificate
1 copy
Product warranty card
1 copy
Main engine head
Ф 5mm, Ф 10mm (ball indentation)


